6 min read
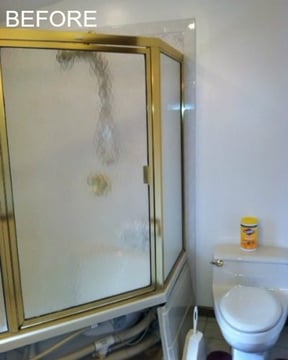
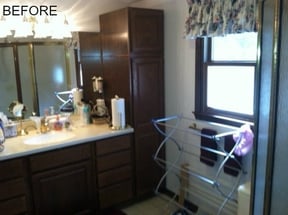
A 1980s master bathroom in a North Syracuse home was renovated with modern amenities. During the 1980s, whirlpool tubs, brass metallic finishes, wood finish trims and solid surface counters with integrated sinks were state-of-the-art in bathroom décor. After thirty years products and design trends change. Today, the features homeowners look for in a master bathroom include walk-in showers without doors, environmentally friendly showerheads, multiple showerheads, comfort height toilets, stone counters, self-closing cabinet drawers and doors, heated floors and safety features such as grab bars and slip-resistant flooring.
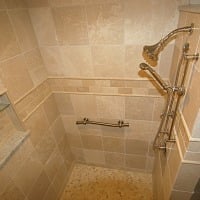
Walk-in shower with no door.
Homeowners’ Objectives
The inspiration for this master bathroom remodel was a beautiful slab of granite with burgundy, peach and brown veining. The homeowners’ objectives were to:
1. Make better use of the space. The tub and shower unit took up much of the floor space in the original floor plan of the bathroom. Storage was not sufficient.
2. Eliminate a whirlpool tub/shower unit and replace it with a walk-in shower without doors. Many whirlpool tubs from the 1980s have not stood the test of time. Jets often fail and bacteria can build up. The glass surround was difficult to clean and involved stepping into the tub to clean the interior. A walk-in shower without doors would be more accessible and much easier to maintain.
3. Add new shower fixtures that provide comfort. Today’s shower fixtures include adjustable handheld units and waterfall showerheads. Niches and seats can be added to keep supplies on and provide a place for shaving.
4. Replace the cabinets. The homeowners had tired of the dark stained cabinets. Cabinet drawers were shallow and did not provide adequate storage for smaller items.
5. Create a vanity that would include two sinks and serve as a focal point in the room. The original vanity had one sink. A slab of granite that appealed to the homeowners would be used for a new dual sink vanity.
6. Update tile and flooring. Tile would need to be replaced when the tub was removed and refitted to accommodate a walk-in shower. The color of the original tile would not work with the new vanity counter. The homeowners also wanted a heated floor.
7. Add features for safety and comfort. The present bathroom seemed old and crammed. The tub was not functional or comfortable. With a shower, adding grab bars, lighting in the enclosure and slip-resistant flooring would be important for safety. A seat would provide a space for grooming. Multiple showerheads would make a shower a relaxing experience.
McClurg’s Solutions
1. Redesign the bathroom.
The new bathroom design includes a walk-in shower with an open wall and a half wall with a glass partition that allows more light in the shower. The shower has no door and a low threshold, which make it easy to maintain and access. The open wall serves as a partition to the commode area. The linen closet was removed to create space for the double sink vanity. To replace the storage space of the linen cabinet, a second base cabinet was added to the vanity and an above the counter cabinet was used to separate the sinks and personal grooming spaces.
2. Add a custom walk-in shower without doors.
The old shower/tub area was removed to create space for a walk-in shower. A slip-resistant Onyx custom shower base was fitted to the new space and installed. A pre-fabricated shower-seat was added to a corner and placed just outside the range of the waterfall shower. A built-in wall niche provides storage for soaps and hair care products.
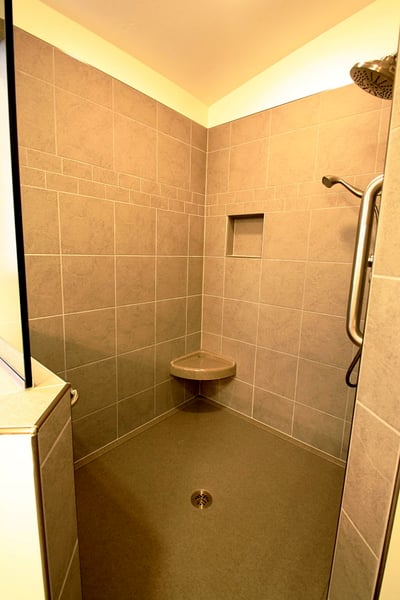
Walk-in shower with Onyx custom shower base.
3. Install new plumbing and electrical to accommodate new fixtures.
The owners wanted both a handheld shower and a rainfall shower. Plumbing was re-worked to install both and for two sinks on the vanity. Two separate double-light fixtures were placed over the vanity and the above the counter cabinet has an under-cabinet light. Electrical for the heated floor unit was also installed. Electrical outlets were placed in the vanity area. A fan-light was installed over the shower. New switches were installed for lights, the fan and heating.
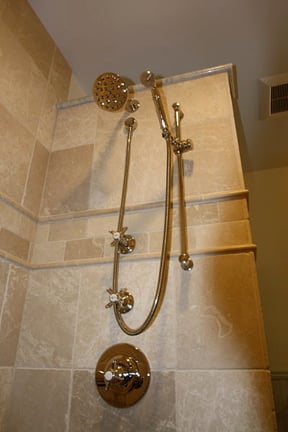
Rainfall and handheld showerheads.
4. Add new cabinetry.
The homeowners selected natural finish maple cabinets that complement the granite. Base cabinets include a toe-kick and crown molding was used to finish wall cabinets. Brushed nickel hardware and accents were used throughout the room. A cabinet was placed above the toilet for extra storage.
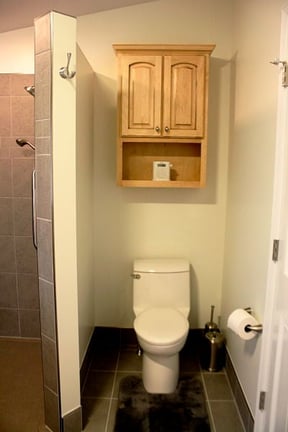
One-piece toilet with maple cabinet topper.
5. Design the vanity to be the room’s focal point.
The granite slab was fabricated to accommodate two oval undermount porcelain sinks and faucets. The backsplash was also made from the granite. A waterfall edge was used on the counter. Storage includes two base cabinets and six drawers. The owners chose four deep drawers that can be used for a variety of items including towels. Two oval mirrors with matching light fixtures were placed above the sink.
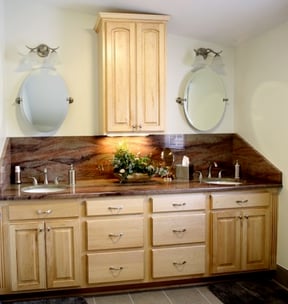
Vanity with granite countertop and backsplash.
6. Install new flooring and wall tile.
Low maintenance, slip-resistant 12-inch travertine tile was selected for both the walls inside the shower and the flooring. The size of the tile requires fewer grout lines, so there is less grouting to clean. A 3-by-6 inch tile border was used on the shower interior as a decorative accent. For easy care and to eliminate the problem of rot that can occur with wood floor molding in a bathroom, tile was used as a floor molding around the shower and toilet areas of the room.
7. Include Universal Design features.
Universal design elements were used throughout the project for function, safety and comfort. Among these are:
- A comfort height toilet
- Low threshold entryway in the shower
- A handheld shower
- A shower seat
- Lever handle faucets in the shower and vanity
- Rocker light switches
- Base cabinets with toe-kicks
- A grab bar in the shower
- Improved lighting
- Slip-resistant tile flooring

Lever handle bathroom sink faucet in brushed nickel finish.
Related Posts
Master Bath Design Ideas for Comfort and Enjoyment
If you’re planning to remodel your master bathroom consider including features to create a...
9 Stylish Design Ideas for Bathroom Vanity Sinks
When it comes to choosing a sink for your bathroom remodel or upgrade project there are a number of...
Project of the Month: Kitchen and Dining Room Remodel
The owners of a split-level ranch-style home built in 1977 wanted to remodel their kitchen and...