6 min read
Bathroom trends and lifestyles change over time. In the 1980s and 1990s desirable features in a master bathroom included a large whirlpool tub and a small shower. A dressing area with a vanity, where a woman could be seated to apply her makeup, and brass finishes were also trends. Today, comfort and easy maintenance are important in bath design.
Our Project of the Month features a late 1980s-era master bathroom in Manlius, NY that was completely remodeled to provide a practical retreat for the homeowner. Updates include an expanded vanity, a private area for the toilet and a walk-in shower without doors that can be turned on by a remote control unit.

Homeowner’s Objectives
The original configuration of this 9-by-10 foot bathroom did not meet the homeowner’s needs. The shower, toilet and tub were placed close together, while a dressing area was a wasted space.
The homeowner’s objectives included:
-
Replace the tub with a walk-in shower.
The large tub was seldom used and the shower was not adequate.
-
Relocate and replace the toilet.
The toilet was near a window that impeded privacy.
-
Reconfigure the vanity.
There was a dressing room area with a vanity sink separated from the bathroom by a wall that was not used and could be factored into the redesign of the space.
-
Replace the flooring.
The white tile flooring did not conform to the homeowner’s décor preferences and would need to be removed during project demolition.


McClurg’s Solutions
To meet the homeowner’s objectives this project required a complete redesign of the existing space. Drywall, fixtures and floor tile were removed to allow for the reconfiguration.

1. Remove the original tub and shower and install a doorless walk-in shower.
The homeowner wanted an easy-care walk-in shower without doors and selected a base and shower wall panels from Onyx. He chose a stone pattern with 12-by-12 inch tiles and a gloss finish in “Khaki” along with 3-inch crown molding trim. The panels can be cleaned with little effort by wiping them with a sponge or cloth since they have no grout.
The homeowner also selected an ioDigital spa unit from Moen with four wall jets, a rain showerhead and a handheld showerhead that can be operated with a remote control unit that enables him to adjust the settings and turn on the shower from the bedroom.
An on-demand water heater was added to the home during the project.


2. Relocate the toilet and provide privacy.
The ceiling of the bathroom is 96 inches high. An 84-inch partition panel was built as a privacy wall for the toilet, which was relocated to the space previously occupied by the shower.

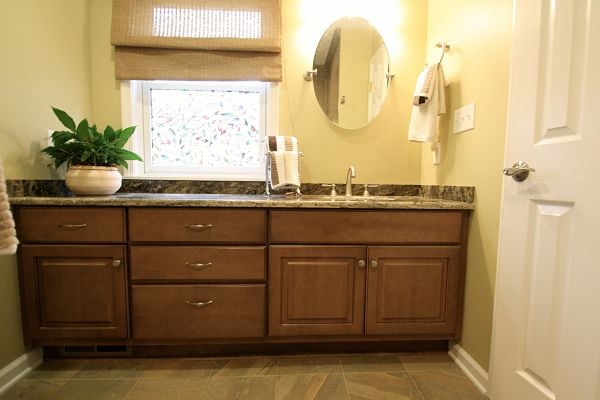
3. Install a single, larger vanity.
Removing the wall that separated the bathroom and dressing area allowed for an expanded vanity comprised of three base cabinets, which significantly improved storage. One of the cabinets has three drawers for storing small items.
The homeowner chose one sink, instead of the dual vanities of the previous layout, which also helped to create more functional storage in the other base cabinet.

4. Update the flooring.
The white ceramic tile floor was replaced with 12-by-12 inch brown tile from Olympia Tile to unify all of the elements in the room. The tile was set to provide a level threshold in the doorway to a closet.

Related Posts
Project of the Month: Master Bath with a Doorless Walk-in Shower
A master bath is a homeowner’s personal space. When a bathroom doesn’t meet the needs of the users...
Project of the Month: Walk-in Shower Master Bathroom Remodel
The owners of a hill top house in Tully, NY have spent considerable time updating and redesigning...
Project of the Month: Master Bath with Walk-in Shower and Walk-in Closet
Our “Project of the Month” is a master bathroom remodel in Fayetteville, NY featuring a large...