6 min read
The owners of a split-level ranch-style home built in 1977 wanted to remodel their kitchen and adjacent dining room for entertaining family members, especially grandchildren. The original kitchen was dark and closed in by a wall that separated the space from the dining area. The kitchen had a U-shaped configuration with a narrow work aisle that constricted the flow of traffic in the room when the family gathered together for holidays and special occasions. Lighting was dim and appliances were outdated.
We worked with the Weedsport, NY homeowners to update the kitchen to better meet their needs. In addition to designing a functional plan for storage and creating more counter space, the first floor of the home was unified by the installation of oak flooring, moldings and trims selected for the project. The remodel took six weeks to complete.
This kitchen remodel provides an open area for entertaining family and friends.
Project Consultant: Jayson Breckheimer
Lead Carpenter: Jim Welch
Homeowners’ Objectives
- Create a floor plan to open up the kitchen incorporating the adjacent dining room. The dimensions of the kitchen were 12.25-by-11 feet. The narrow work aisle, the configuration of the kitchen and a lack of counter space limited its use for preparing meals and did not include a space for informal dining.
- Improve the work areas. The small kitchen had little counter space for food preparation and cleanup. On the back wall of the kitchen there was a long narrow buffet cabinet and an open shelf on the wall for display. The placement of the refrigerator also obstructed the workspace.
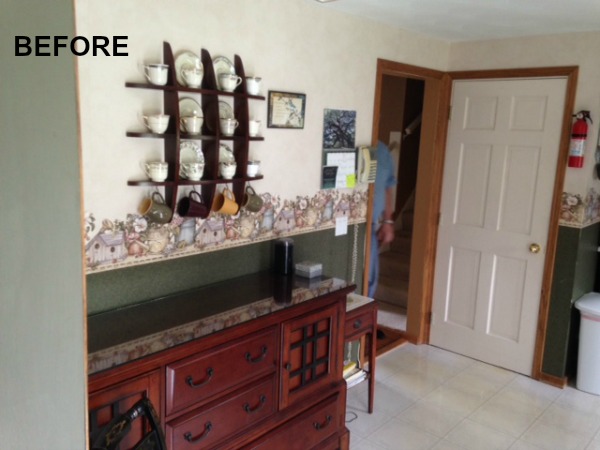
A narrow buffet cabinet topped with glass provided little practical storage and was not suitable as a surface for preparing food or baking.
- Optimize storage. Cabinet storage in the original kitchen was impractical. The homeowners would have to kneel to access base cabinet storage. Upper cupboards reached to the ceiling making it difficult to find items if they shifted toward the back of the cabinet.
- Improve lighting. The primary lighting to the room came from a window over the sink and a large fluorescent light fixture on the ceiling. The dark wood stained cabinets did not allow for reflective light in the room. The location of the refrigerator also blocked light in the room. A door with a window leading onto a deck was located next to the refrigerator. The dining room had two additional windows and a hanging uplight fixture that diffused light into the room.
- Keep with the style of the home and its furnishings. A dining room set would be used in the redesigned space. It had clean and simple lines. The homeowners also had collected some antique furnishings.
- Improve the “traffic flow” on the first floor of the home and unify elements. The wall between the kitchen and dining room was a barrier. Flooring on the ground level of the home was diverse and segregated the rooms – vinyl flooring in the kitchen, wall-to-wall carpet in the dining room and parquet flooring in a hallway.
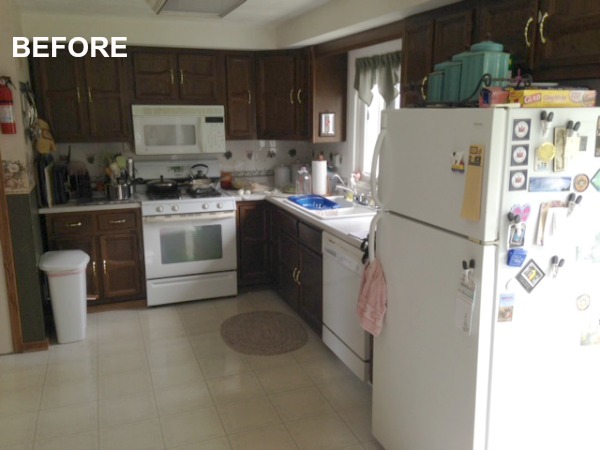
The original kitchen was designed for one primary cook and lacked both counter and storage space. Inadequate lighting and dark cabinetry made the room dim. The location of the refrigerator contributed to the crowding of the space.
McClurg’s Solutions
1. Design an open floor plan connecting the kitchen and dining room.A wall separating the kitchen and the dining room would be removed to open up the space allowing for reconfiguration of cabinetry and some appliances. The dimensions of the combined rooms are 28-by-11 feet. During the process of remodeling unexpected problems were discovered. The wall that we removed was an interior wall and did not require additional support, however, we found that the main beam in the basement was in need of replacement. It was replaced with new steel posting and a triple LVL beam.
2. Expand counter space.
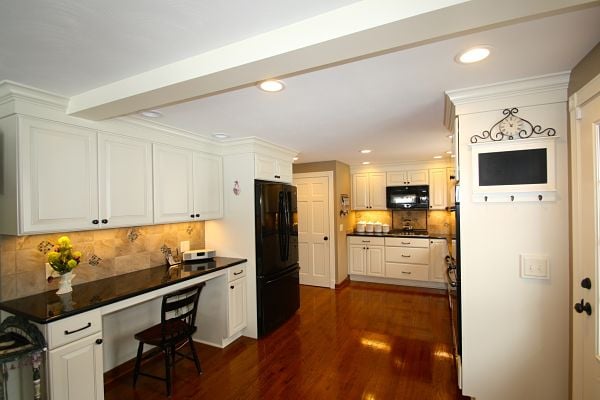
The U-shaped configuration of the kitchen would be retained. The sink, dishwasher, microwave vent hood and cooktop would remain in their current locations. The refrigerator would be placed on the back wall and a double oven would take its place. Changing the location of the refrigerator also extended the counter space in the kitchen where every inch of counter counts. To further expand counter space, a long “desk area” was built onto the back wall where the buffet had been. The kneehole opening was large enough to accommodate two seats or stools. It could be use as a workspace, baking area or a place for informal dining. “Absolute Black” granite counters with a waterfall edge were selected by the homeowners.
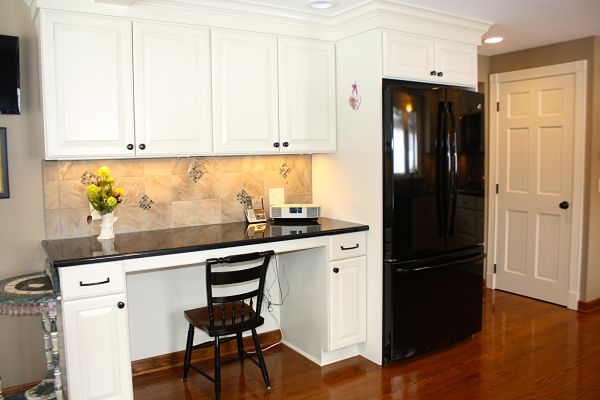
A counter area was built on the back wall of the kitchen. Cupboards were added and a new refrigerator was relocated to the space.
3. Add cabinets that are accessible and functional.
Storage drawers replaced base cabinets for easy access. A corner carousel was added near the cooktop and sink. Two double cupboards were mounted on the back wall where the display shelf had been. Upper cabinets were brought to a height where contents could be easily reached. The cabinets used for this project are from Bishop Cabinets and hardware from Top Knobs.
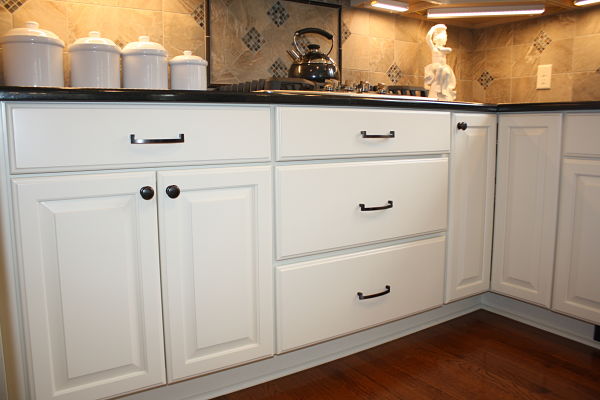
Deep storage drawers and a corner carousel were added to make storage more accessible and functional in this kitchen.
4. Improve lighting.
Removing the wall and relocating the refrigerator brought more natural light into the kitchen. Recessed ceiling lights replaced the single florescent fixture distributing general lighting throughout the kitchen. Under-cabinet lighting was used to illuminate task areas. A pendant light fixture was installed over the sink. The dining room uplight fixture was replaced with a downlight fixture that disperses light more effectively in the room.
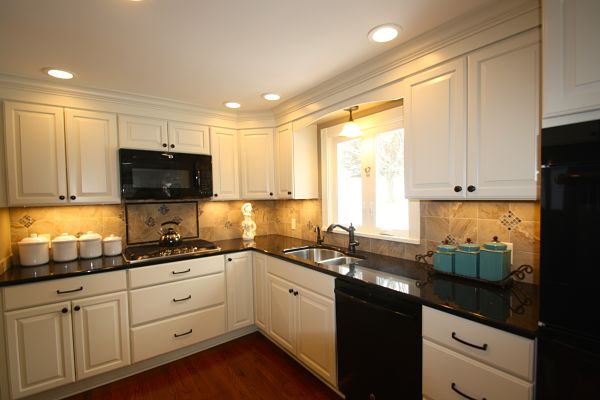
Improved lighting in the kitchen includes recessed ceiling lights, under-cabinet task lights, a downlight pendant over the sink, natural light from windows and reflective light from the white cabinets selected for the room.
5. Design the kitchen and dining room to complement the home and its furnishings.
A Transitional style décor in the kitchen would provide a setting for both the updates and items the homeowners valued. Trims were painted white. A neutral backsplash design was used and comprised of easy-care 6.5-inch square porcelain field tile accented with 3-inch stone mosaic tile diamonds. Linear tile and a diagonal layout breaks up the grid pattern and creates a focal point over the cooktop. The backsplash complements the white cabinets, counter surface and wood flooring.
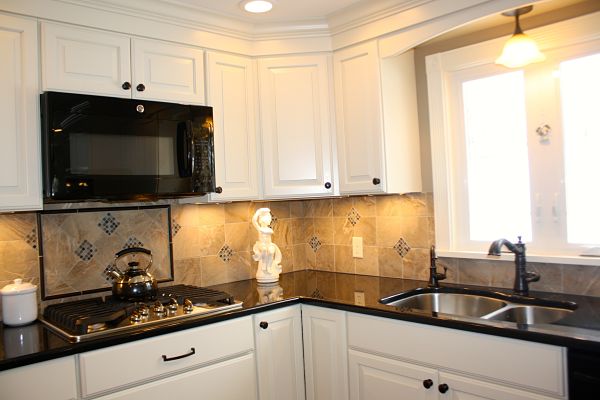
The backsplash design is practical, stylish and integrates cabinets, counters and fixtures.
6. Unify elements on the first floor of the home.
Several changes were made to unify elements on the first floor:
- Red oak wood flooring with an “Old English” stain installed and refinished throughout the first floor to connect the rooms and hall.
- New railings and balusters were installed on the staircase to complement trims and moldings.
- Moldings, trims and door and window frames and casings were painted white.
- Crown molding detail that continued to the 7.5-foot ceiling was added to the cabinets to create an illusion of height and space in the small kitchen.
- New black appliances were selected to coordinate with the black granite counters.
- Neutral paint colors were selected for the walls.
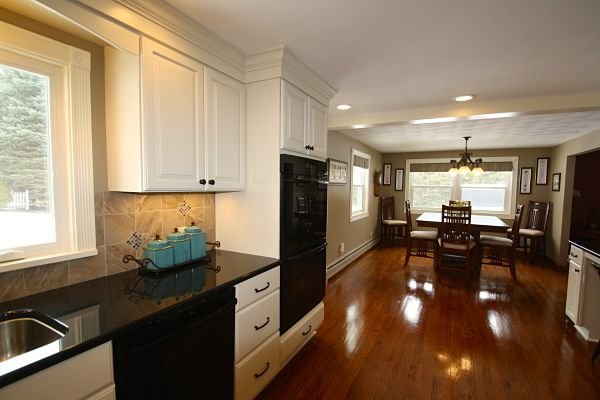
Flooring, trims, cabinets, fixtures and paint colors were selected to unify the rooms.
Related Posts
Project of the Month: Open Concept Floor Plan for a Ranch Home
The project we selected to showcase this month is a renovation of a Post-World War II ranch home...
Project of the Month: Lakefront Porch Addition and Outdoor Kitchen
The owners of a cottage located on Canandaigua Lake enjoy entertaining family and friends. To...
Project of the Month: North Syracuse Master Bathroom Remodel
A 1980s master bathroom in a North Syracuse home was renovated with modern amenities. During the...