5 min read
This month’s featured project is from a colonial style home built in 2000 in Manlius, NY. The home’s small, narrow kitchen had become outdated and inefficient. Working with the homeowners, we redesigned the kitchen and added new space to create more storage, seating, workspace, and a place for people to gather.
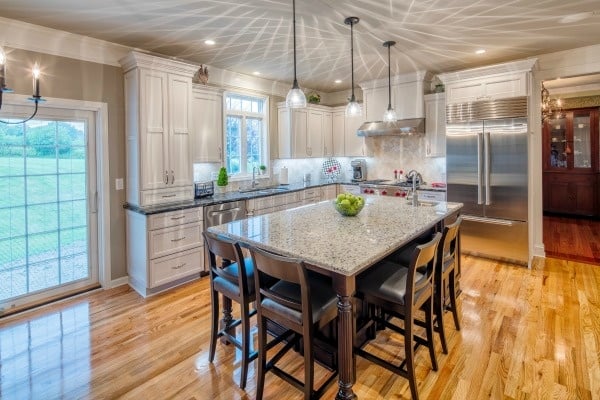
The stylish new kitchen features a spacious island with seating for four, a bar sink, a drawer microwave oven and storage for wine.
Updated appliances were also installed to better meet the needs of the homeowners. The project took about three months to complete.

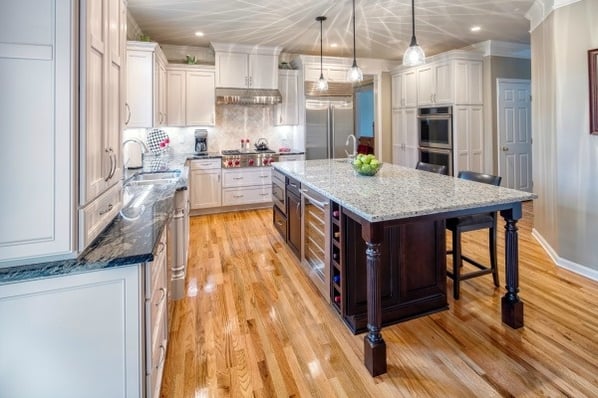
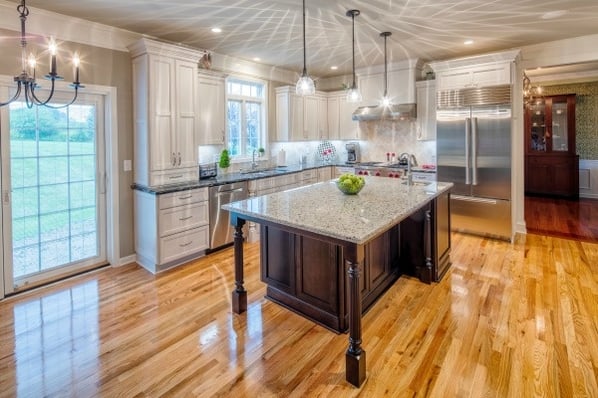
A large island is the centerpiece of this stunning and practical kitchen. Three pendant lights illuminate the island and there is ample seating. The homeowners selected wood stained cabinet base units and a white patterned granite countertop for the island to contrast with the painted white perimeter cabinets with black granite counter surfaces.
Homeowners’ Objectives
1. Increase the size of the kitchen. The original 9½-by-21 foot kitchen (about 200 square feet) had a very narrow island and felt confined. The owners wanted to build an addition to gain more space.
2. Replace the original cabinets. The original cabinets were builder’s grade quality. The owners decided to upgrade the cabinetry for style and function. They wanted the kitchen to blend with other rooms of the home that are open, spacious and inviting.
3. Replace and upgrade the appliances. Some of the appliances were not working and others had reached a point for replacement.
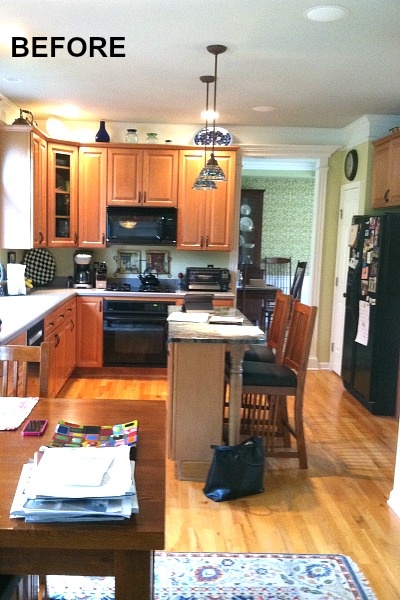
BEFORE: The original kitchen was small and inefficient. A narrow island provided seating for two and limited storage. Work aisles were also narrow and perimeter counter space insufficient. The appliances were outdated. The maple cabinets had become outmoded and did not reflect the style and decor of the home.
McClurg’s Solutions
1. Update the Original Kitchen Space and Build an Addition
The kitchen was expanded by building a 4-by-20 foot addition onto the back of the home. The additional space allowed us to create a floor plan for the kitchen that was more open and spacious.
The new dimensions of the kitchen are 13’7”-by-21’4” or approximately 290 square feet, which provides 45 percent more space than the original kitchen.
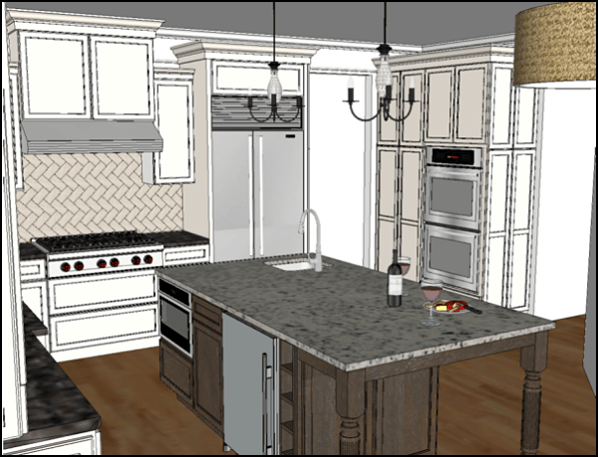
Perspective drawing showing placement of appliances.
The new design of the kitchen includes a large center island that has a wine refrigerator, a prep sink, a microwave drawer and cubbies for wine storage. Seating on the island is oriented to face the work area so that a cook can converse with family and guests.
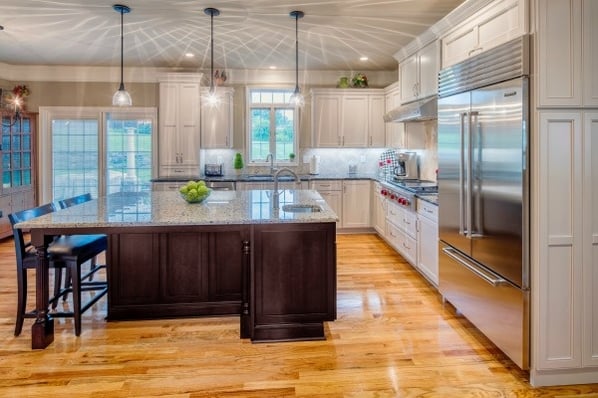
While the center island is the focal point of the expanded kitchen, lighting is also important. Three pendant lights were placed over the island. The glass pendants create a pattern on the ceiling when lit. LED recessed lights were installed around the perimeter of the island and LED lights were also installed under the cabinets. Natural light is brought into the room by a custom double casement window with a transom window, by Andersen, placed above it. We are Andersen certified installers. A salvaged sliding door also adds natural light.
2. Install Stylish Two-tone Cabinets
The homeowners wanted to add interest to the kitchen with their cabinet and counter selections by using two-toned cabinets with contrasting counter surfaces.
Cabinets are a custom wood design from Bishop Cabinets: “Walden Pond” with different finishes - “Chalk” for the perimeter and “Espresso” for the island add style to the room.
Granite was used for the counters: “Graphite” for the perimeter and “Blanco Leblon” for the island.
Crown molding was used to add architectural interest. A small pantry closet was removed and the space reconfigured for installing wall ovens and tall pantry cabinets.
The dimensional look in the kitchen is achieved by installing wall cabinets at varying heights and installing crown molding above the cabinets and on the walls near the ceiling. Cabinet panels were used to frame the wall oven (at the right of the photo) to add texture and balance to the design.
The kitchen also includes an area for a casual dining table. This photo shows the alignment of the cabinets in the work area. The paint color on the walls of the kitchen is Benjamin Moore “Pashmina” AF-100.
3. Install New Stainless Steel Appliances
The homeowners selected stainless steel appliances for their new kitchen.
A Wolf cooktop with venthood and a large double door Subzero refrigerator were installed on the perimeter for the kitchen to create a functional workspace for preparing meals. We are Wolf and Subzero Factory Certified installers.
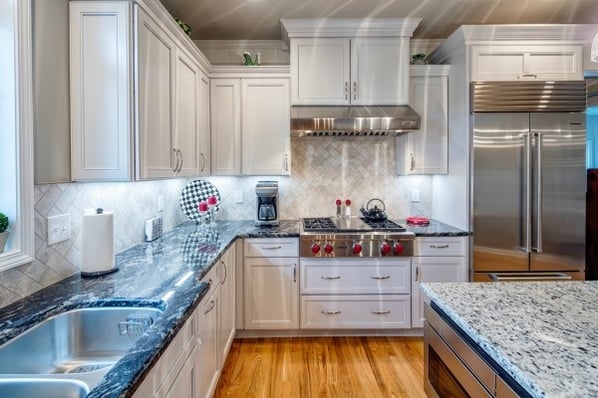
The homeowners chose a Wolf gas fueled cooktop and a venthood with lights that illuminate the cooking surface. A Subzero refrigerator is conveniently located near the cooktop. A microwave drawer oven is located nearby on the island and across from the sink to create and efficient work area.
A new backsplash in a herringbone pattern was used to unify appliances, counters and cabinetry.
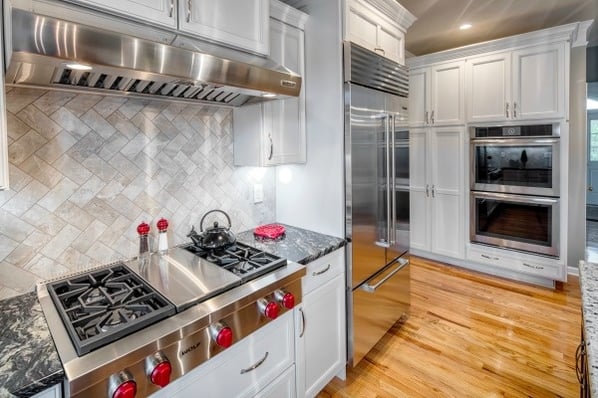
The herringbone pattern design of the backsplash was set with 3-by-6 inch tile from Best Tile's “Series W Dust.” The oak flooring has a gloss finish for durability and for pets.
During construction of the addition we encountered two minor problems. First, there were some large boulders discovered during excavation that needed to be removed. Second, as we salvaged a slider door for reinstallation, we discovered dry rot in the existing walls. We were still able to reinstall the door, and we resolved the dry rot problem by installing proper waterproofing.
Related Posts
Project of the Month: Dining Room and Kitchen Remodel
The owners of a saltbox style home in Mexico, NY wanted to update their kitchen and incorporate the...
Project of the Month: Open Concept Floor Plan for a Ranch Home
The project we selected to showcase this month is a renovation of a Post-World War II ranch home...
Project of the Month: Kitchen With Two Islands
The kitchen is the heart of a home. It’s important that the space meets the needs of the people who...